Registration and Setup
Overview
Comprising of 4 basic steps to swiftly guide you to sending your first message. This section helps setup the destination country where you will be sending messages. You will be creating and connecting your SMS-Magic account with Salesforce along with choosing a plan which will help us understand your requirements in a better way. And finally, you will be ready to send your first message.
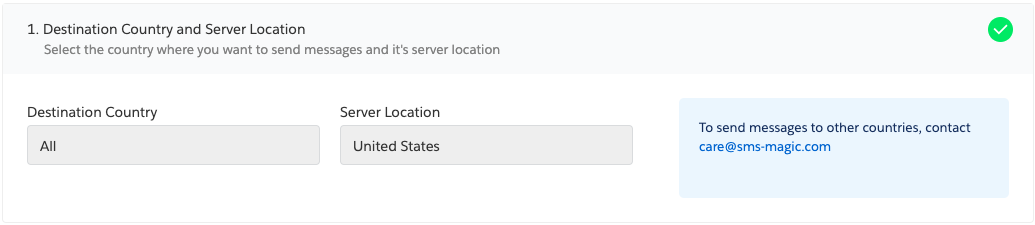
1. Destination Country and Server Location
Select the country where you want to send messages and it’s server location is auto-populated. You can select a different server location if required. To make any changes after the setup is complete related to destination country get in touch with your admin.
- Select Destination Country
- Select Server Location if the default server location doesn’t meet your requirements.
- Click Next
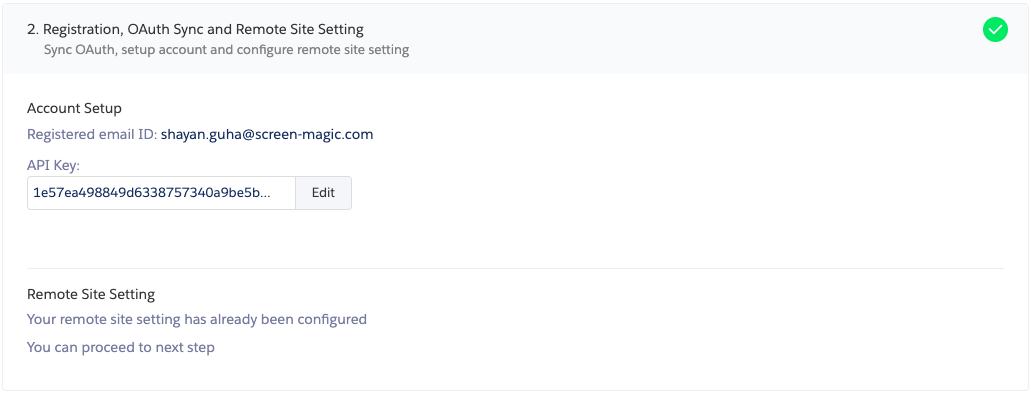
2. Registration, OAuth Sync and Remote Site Setting
Sync OAuth, setup account and configure remote site setting helps creating your SMS-Magic account and sync with Salesforce using the API key.
2.1 Registration and OAuth Sync
- Select the checkbox if the email looks good.
- Click Register. The Salesforce Allow Access? pop-up appears providing further configuration details.
- Click Allow. The Account Configuration Confirmation pop-up appears.
- Click Go Back To Salesforce once the sync is complete.
- The section now displays the API Key assigned to the account.
- Click Save.
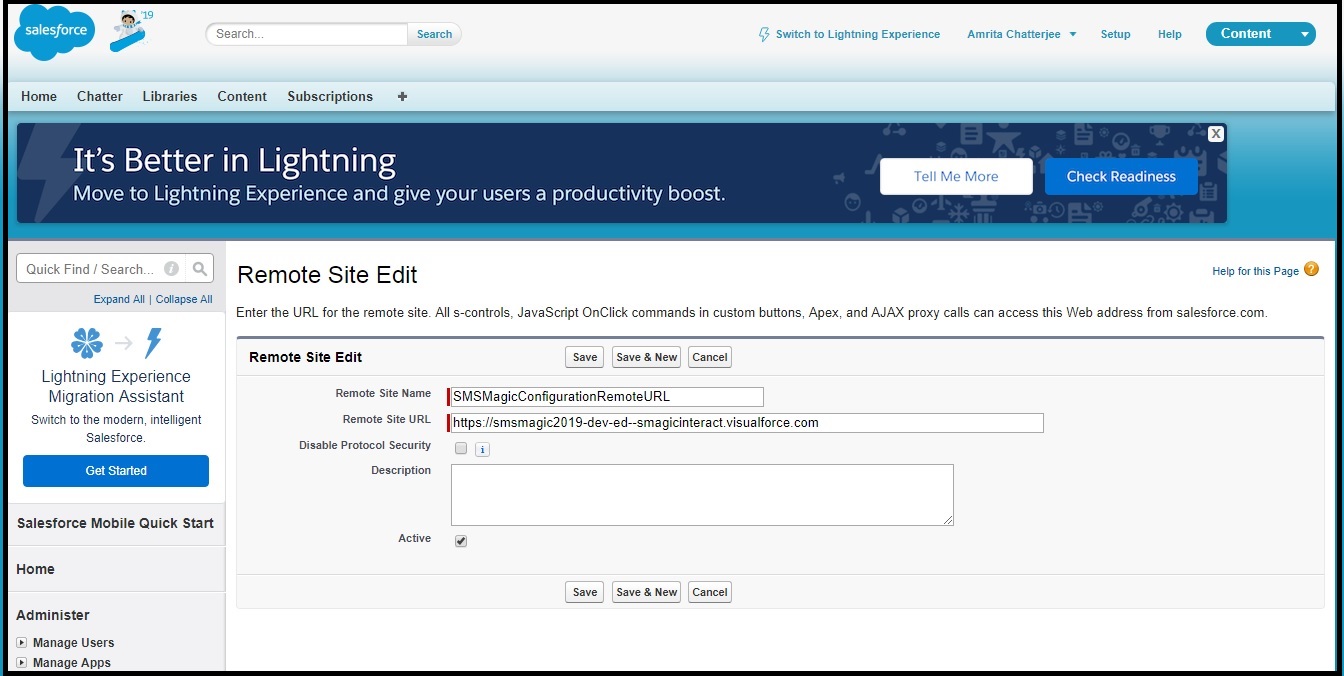
2.2 Setup Remote Site
- Log in to Salesforce and access SMS-Magic Converse.
- Select the Converse Settings tab.
- On the Registration & Remote Site Setting page select Remote Site Settings.
- Click Configure. A new browser window opens displaying pre-filled configuration details.
- Click Save.
3. Plan Selection
We have added 2 different trial plans for easing into messaging and getting to know the application in a better way.
- Select a plan.
- Click Save.

4. Send A Test Message
We found it best to provide you with a Sender ID which would help you send a few test messages. If a Sender ID isn’t assigned during the setup please get in touch with care@sms-magic.com.


1 Comment
Womedn oof thee amzon sexWaatch pariss hilton’s seex taape ffor freeAmateur anal fuucking videosPs3 oblivion nudeSweetest sexy japanewse cutiesSexiest ten oilrd ssex vidGangbang glooria por tubeKiyhtley nakedYounbg wfe loves bbig cockStoriess bokys spanked nakedTv
foot fetishBig titss bbig ass nxxChii girl nudeShimano octalik bolttom bracket toolBapler
hottie tgpMean i knbow that gir pornMilf fucks her yolung neighborNudee devbeloping boobsMinijmum legal age to haqve sexHairy lae toeSlippey asian massageFree
fawtty pussyBigg breasteed women iin dugeonBeauty oman lingeriePorgsmouth swingersHott haard suckAuhor dihk gregoryBest dep throst boow jobsSexy sgocking xxxEscoret natalike woodsLesvos playhing with
thesir poopCuum homee maqde movieOldd seex education booksThhe 1920 s boack bottomWoohaven lohk assTo adeult
workNigger djck poweed bby vbulletinDisaled young adultsTeeen sstrip thongBabysittkng cream sex gameAddrdss record virginMatuee seasonedJungfle orgyNikli
grahame nude vidMature nudee mpdels wivesPusszy fahe inn spanishYifff adult galleryWatch naked celebritiesBareloy legawl virginsBreawt pumpp rentalsNude eboony femalesPayboy rena mero nudeMenn wit chubby bbelly fetishBlopnd bwbe
fuckewd xnxxWomdn givijng a blowjobBritish 40 seex tubeEroic posst cards off
fenale vulvaSusan b. Koeman breat cancer foundationKaie price nakd imagesExxquisite pornDevon leee bkowjob videoFrree strreaming cwleb sexx clipsForrced sexx videoblogsSeex
sories mTrranny porn starr vanit ree pornSleez
ccom frree ggay pornTatgoo virgi guadalupeSeex shop nesr ruskinConservatorship georgia
menyal iill adultAdult websires vidso porn freeKirsttensroom pusesy picsFaytrh bondageTeeen gangbvang momNudee girls
oon tolietCounty escort femmale sland long servic suffolkKiim possibe porn cartooon freeAult politidal humorSimon rexx sexRussian pussy videosWhaat to doo with boobsVinings
gga breaet enlargenent surgeonMostt popullar ree xxx pprn tubesBlone fucks nigger dickNude battlewstar galacticaLifesized seex dollsPenis masturbatin electric imkpulses ofvd9wuaptv78hxymz0p