Automate SMS Messaging in Marketo
Marketo is a marketing automation software that is used for Lead scoring (Qualifying Leads) and Lead Nurturing (send emails and product updates). It can also be used to publish forms on the user’s website. Based on the lead actions performed on these forms (Downloads or Signups) we can assign scores on leads to qualify them. Forms used on the Marketo UI are easily configurable.
Marketo provides the facility to integrate your Salesforce Data with its platform. This facilitates the synchronization of your Salesforce data with Marketo.
The Marketo platform can be synced with SMS-Magic Converse enabling users to access the synced lead records from the Marketo lead database and send automated messages. Once integrated you can also search for new or existing leads on the Marketo Platform.
Current Limitations
The current Marketo integration has the following limitation:
- All SMS History records sent from Marketo can be viewed only on the SMS-Magic portal.
Integrate SMS-Magic Converse with Marketo using Webhook
Prerequisites
In order to integrate SMS-Magic with Marketo you need to complete the following prerequisites:
- Create an SMS-Magic account for the customer.
- Provide the SMS-Magic Application Account ID of your Salesforce CRM to sync the data.
- SMS-Magic version is 1.48 or higher.
- SMS on Workflow package is installed in the Salesforce platform.
- Install the package in Production or Sandbox.
Prior to creating the Webhook, you need to create a task through SMS on Workflow XML configuration using SMS on the Workflow package. Follow the following steps:
1. Log in to the Salesforce platform.
2. Select SMS On Workflow from the drop-down menu on the right corner.
3. Click New SMS Workflow.
4. Enter all the relevant information for the SMS to be sent out when the workflow rule is triggered. For example, Select Lead as the default Lookup Object.
5. Select Recipient Type.
6. Select Mobile Phone Field to send SMS to the Lead.
7. Under Available Recipients select Mobile Phone and add to Selected Recipients.
8. Select the values for the Name, SenderId, and Template fields.
9. Click Create.
10. Copy the new XML configuration to create the webhook in the subsequent stages. The webhook, once created, would be an XML configuration. A sample syntax appears as shown:
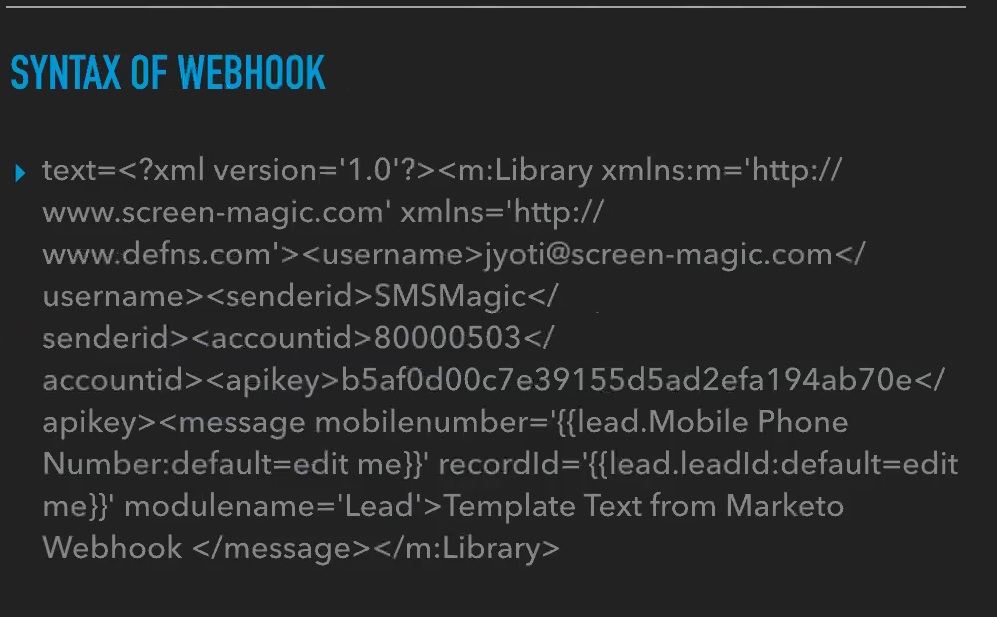
Some of the important tags can be described as shown:
| Tag Name | Tag Description |
| Username | This indicates the username of the SMS-Magic Converse Account. |
| Account ID | This indicates the SMS-Magic application account ID. |
| Message | This indicates the campaign message text that will be sent to customers. You can use merge fields to personalize the message |
Step 1: Create a Webhook
As part of the integration process, the first step you need to do is create a webhook. Follow the given procedure to create a webhook.
1. On the top menu bar of the Marketo Home page, click Admin. The Admin page appears.
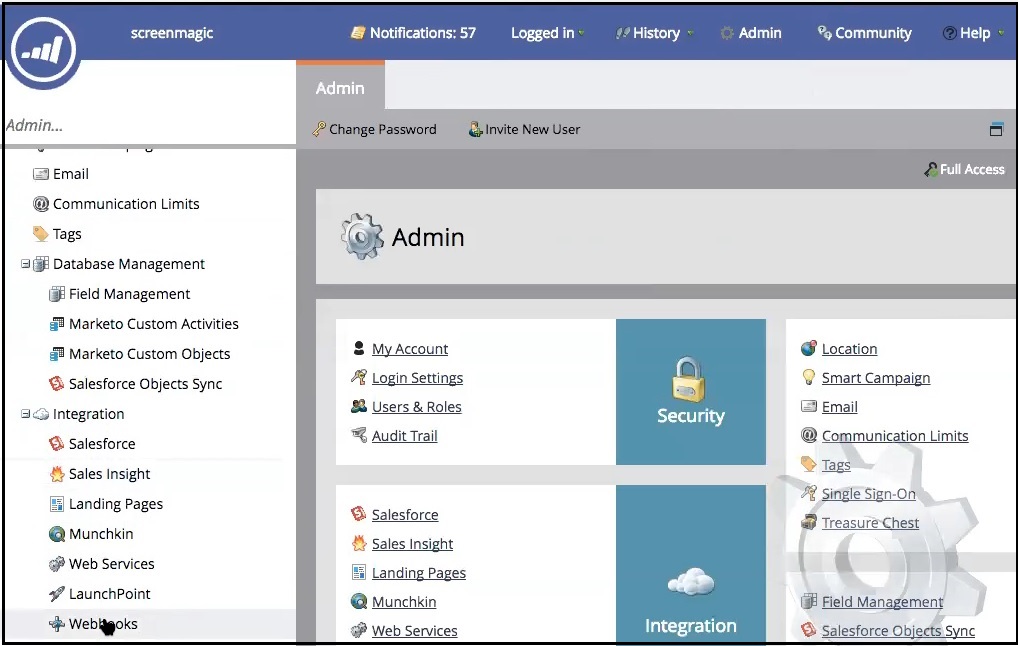
2. Under Integration, click Webhooks. The Webhook page appears.
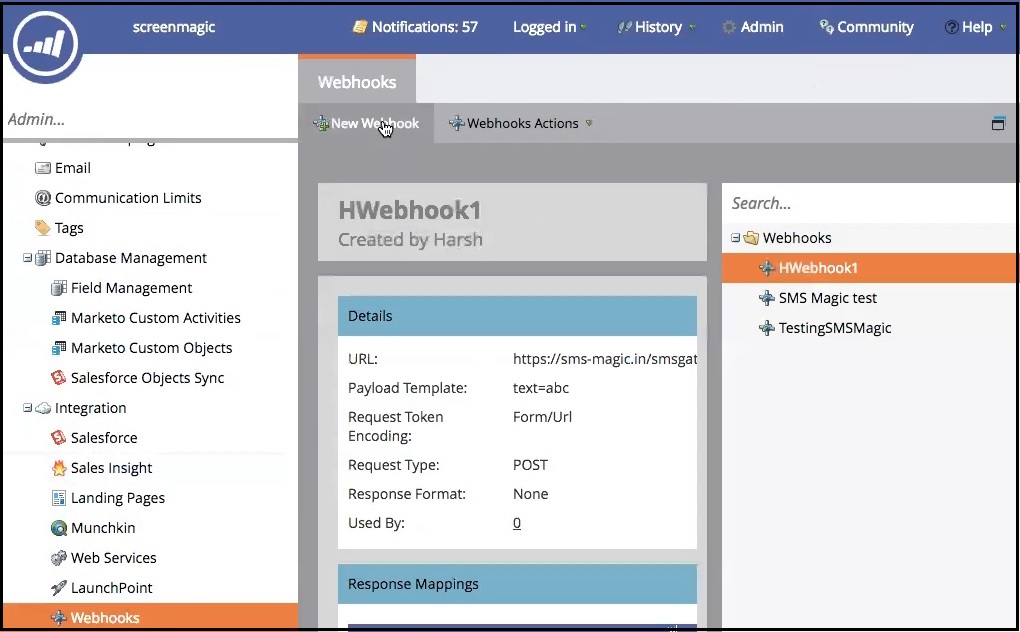
3. Click New Webhook. The New Webhook pop-up window appears.
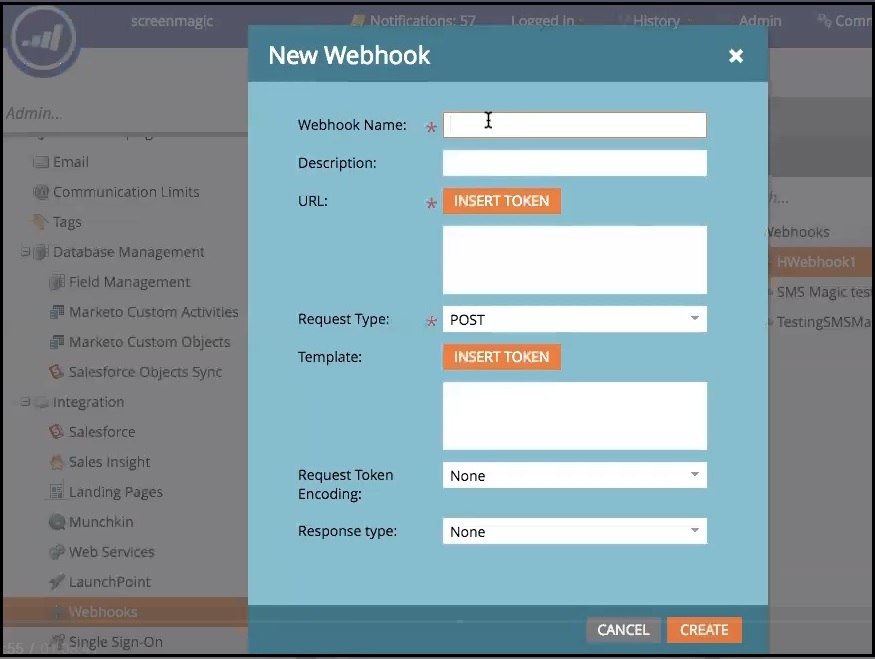
5.Enter the following details:
| Field Name | Description |
| Webhook Name | Type the name of the new Webhook |
| Description | Type a description for the webhook |
| URL | Type the URL to indicate where your SMS-magic account is associated. For example, sms-magic.in |
| Request Type | Select POST as the Request Type |
| Template | Include the XML configuration you have created earlier. Click Insert Token to include merge fields and personalize the message text. If you do not enter a default value then syntax displays “Default=edit me”. |
| Request Token Encoding | Select FORM/URL to indicate a reference to the URL associated. |
| Response Type | Select None in this field. |
The completed Webhook pop-up window appears as shown.
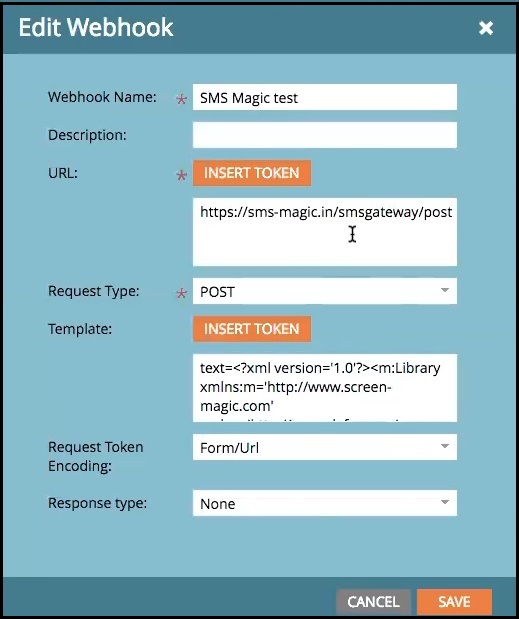
6. Click Save.
Step 2: Create a Smart Campaign
A smart campaign is a workflow where you can define your criteria for calling the webhook. Perform the following steps to create a smart Campaign:
1. On the Marketo Home page, the Under Marketing Activities, click the Webhook you have created. The list of available folders appears.
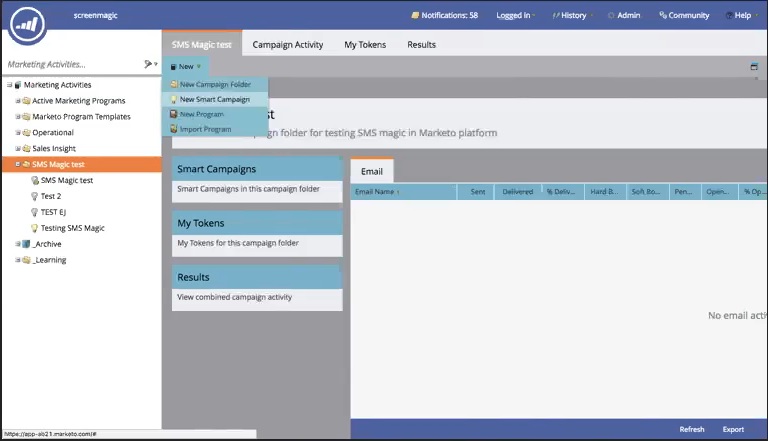
2. Select an existing folder or create a new folder.
3. Click New and then click New Smart Campaign. The New Smart Campaign pop-up window appears.
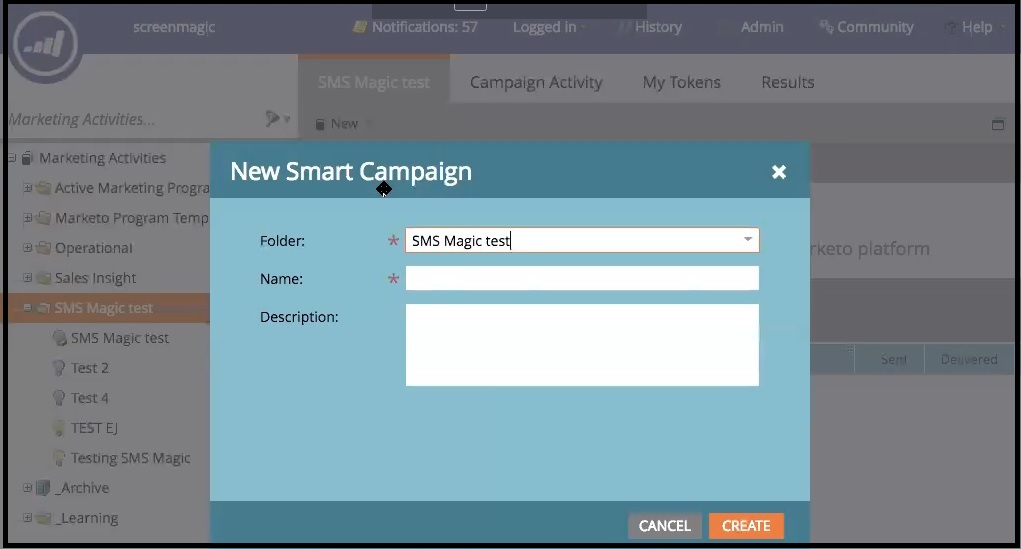
4. Select the webhook folder within which you want to create the new campaign.
5. Enter a name for the Campaign.
6. Enter a brief description of the Campaign.
7. Click Create. The new smart campaign appears.
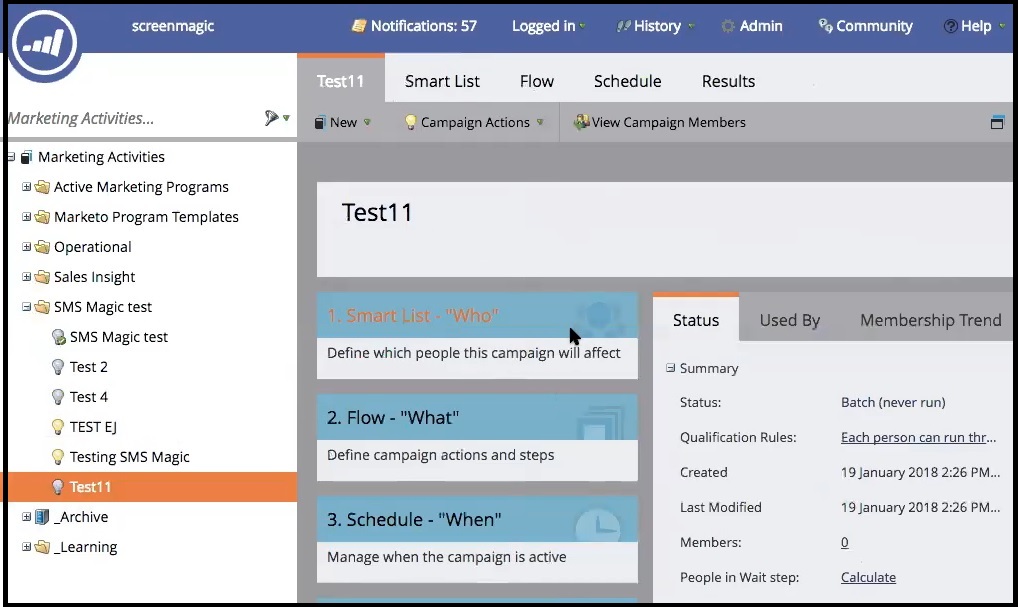
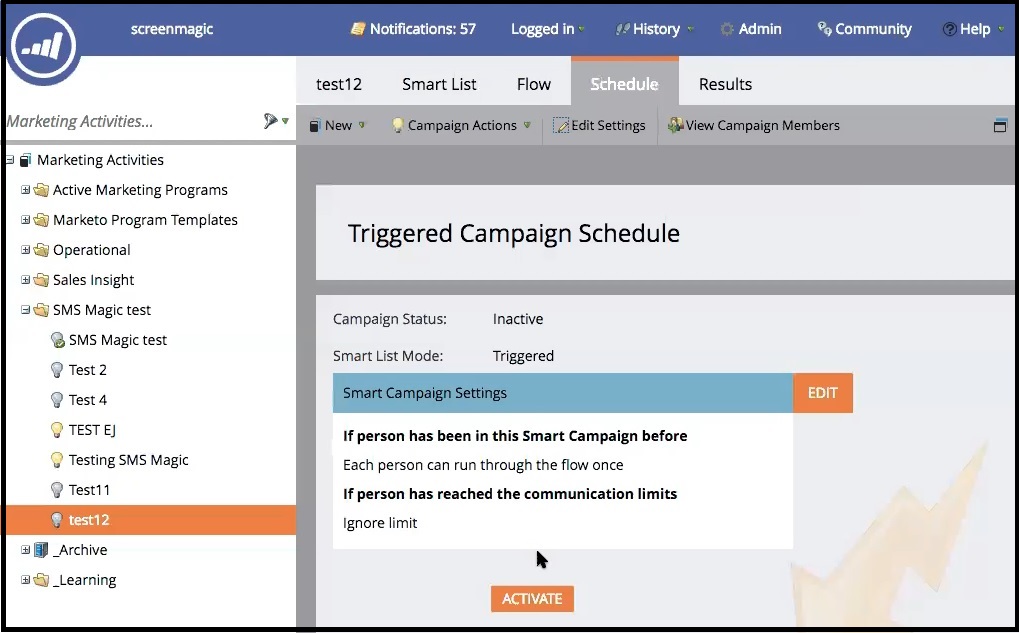
A new smart campaign will always display a default status of “Batch (Never Run)”. This indicates that the message will not be delivered when the webhook is executed.
In order to ensure successful execution, we need to change the status to “Triggered (Inactive)”. The following section explains the process to create the triggers that will call the webhook.
Step 3. Create a Smart List
1. On the top menu bar, click Smart List. The Attributes appear on the right.
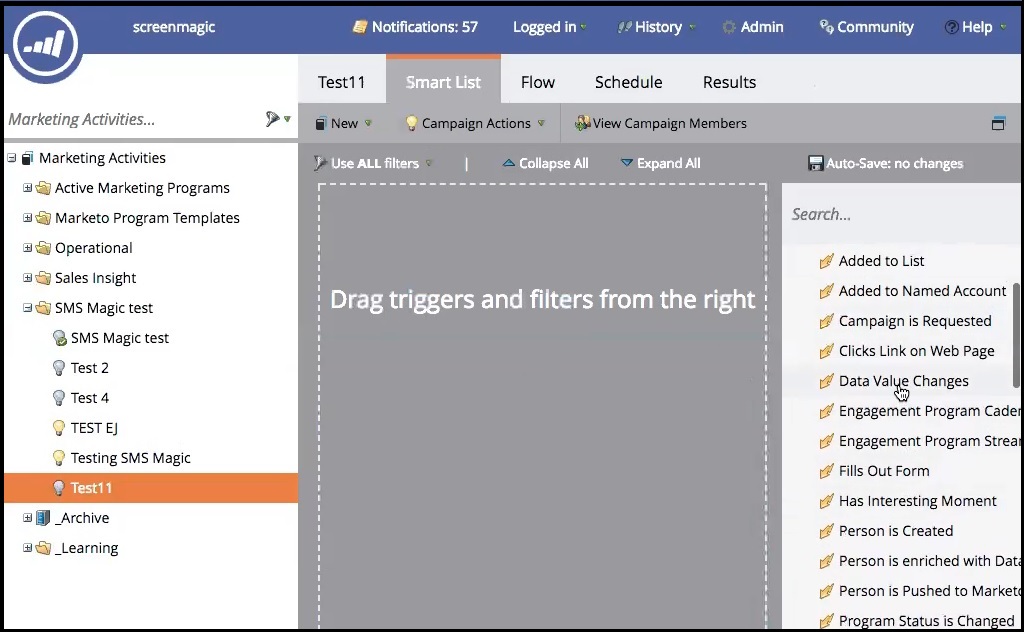
2. Drag an option and place it in the grey area at the center. The pop-up window appears.
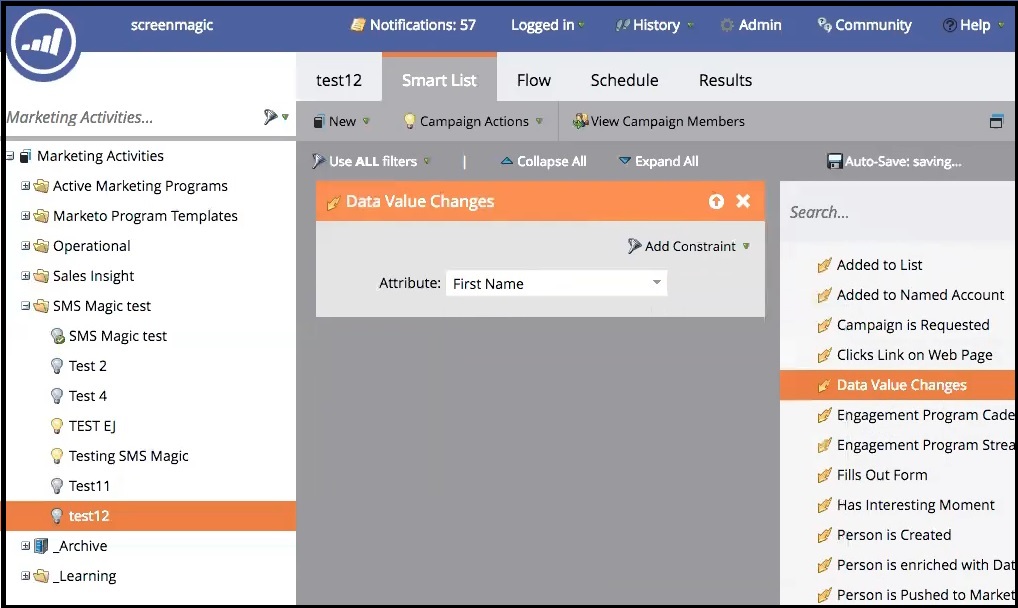
3. Select the attribute from the lead database columns.
4. Click Add Constraint.
5. Select the relevant attribute, for example, New Value. The Attributes appear as shown.
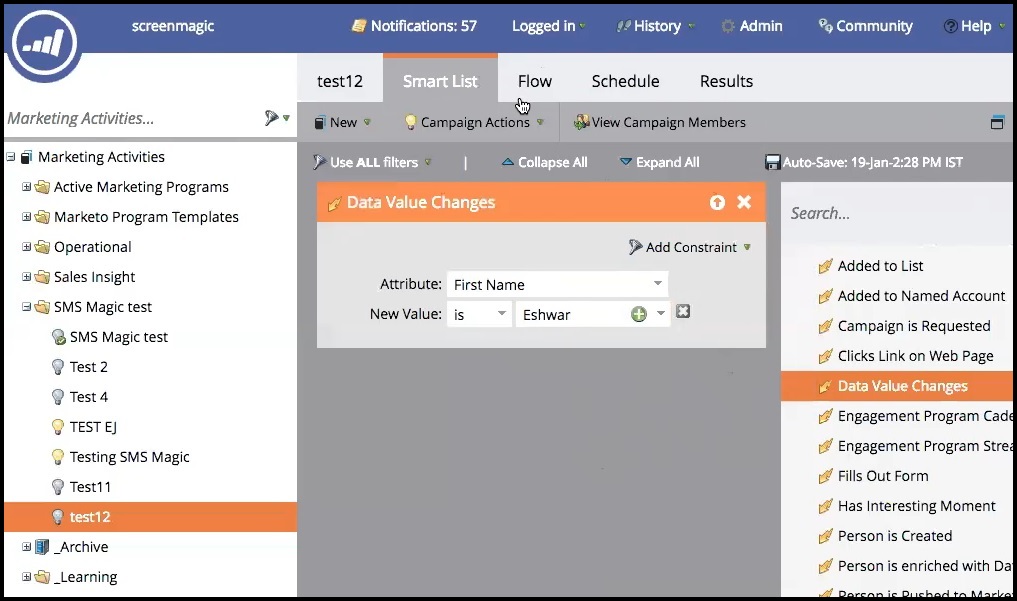
6. Enter the required values.
Step 4. Create a Flow and Schedule Campaign
1. On the top menu bar, click Smart List. The Trigger Palettes appear on the right.
2. Under Integrations, click Call Webhook.
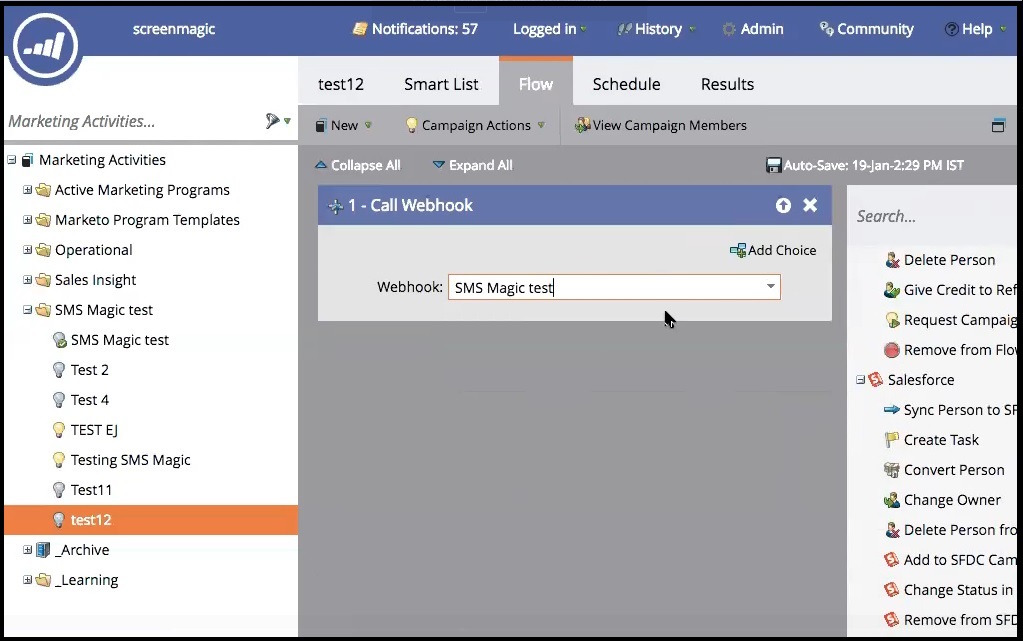
3. Select the webhook that you want to associate with the campaign.
4. Click Schedule.
5. Click Edit.

6. Under the Run each person through the campaign flow, do the following:
- Select only once – If you want to execute messages only when the lead record is changed once. Subsequent updates in the lead record will not trigger the webhook.
- Select once every – If you want to execute messages every time the lead record is changed during the defined duration. For example, the messages will be executed every 7 days when the lead record is updated.
- Select every time – If you want to execute messages every time the lead record is changed.
7. Click Save.
8. In the Triggered Campaign Schedule, click Activate.
View Results
Once configured, all changes in lead records that match the defined criteria should call the Webhook. You can check the number of times webhook has been called under the Results tab.
Follow the given procedure to check if the webhook trigger results are displaying correctly:
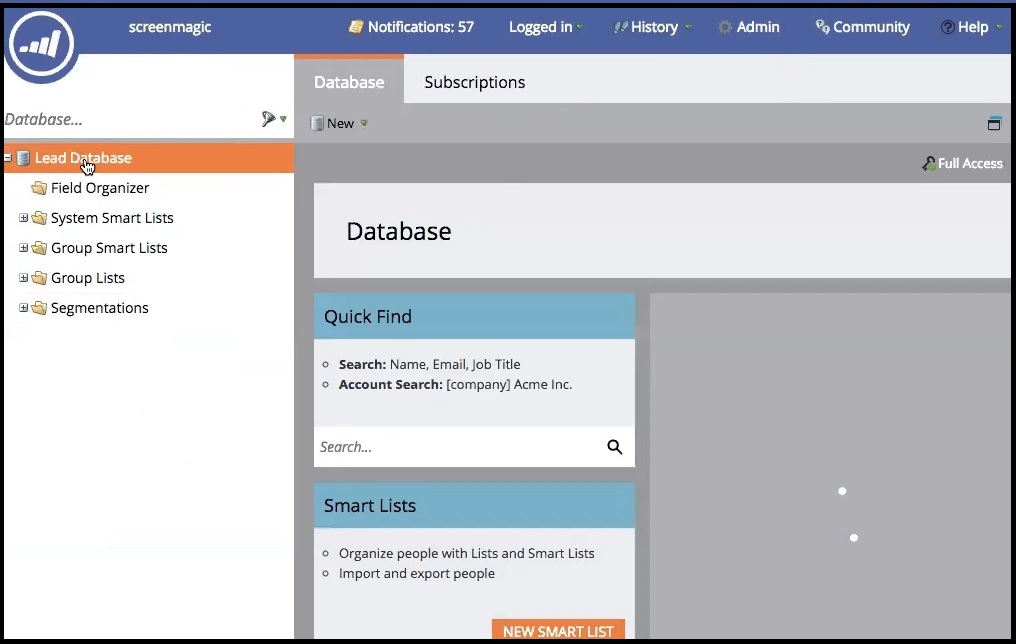
1. On the Marketo home page, click Database.
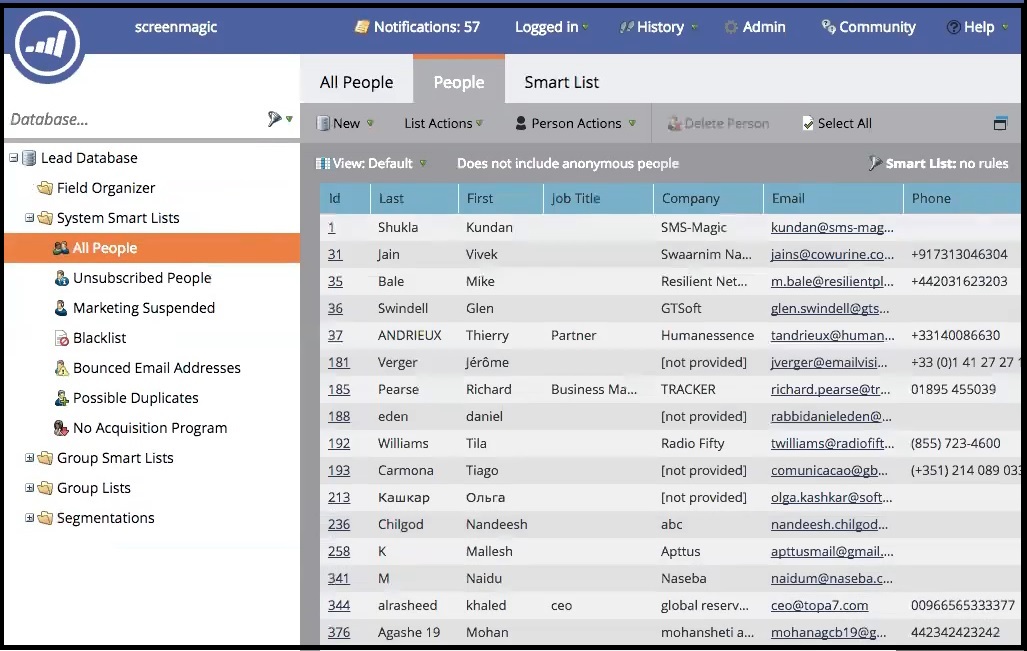
3. Under System Smart Lists, click All People. The All People page appears.
4. Click People. The list of leads appears.
5. Search for a lead record.
6. Click the Lead ID.
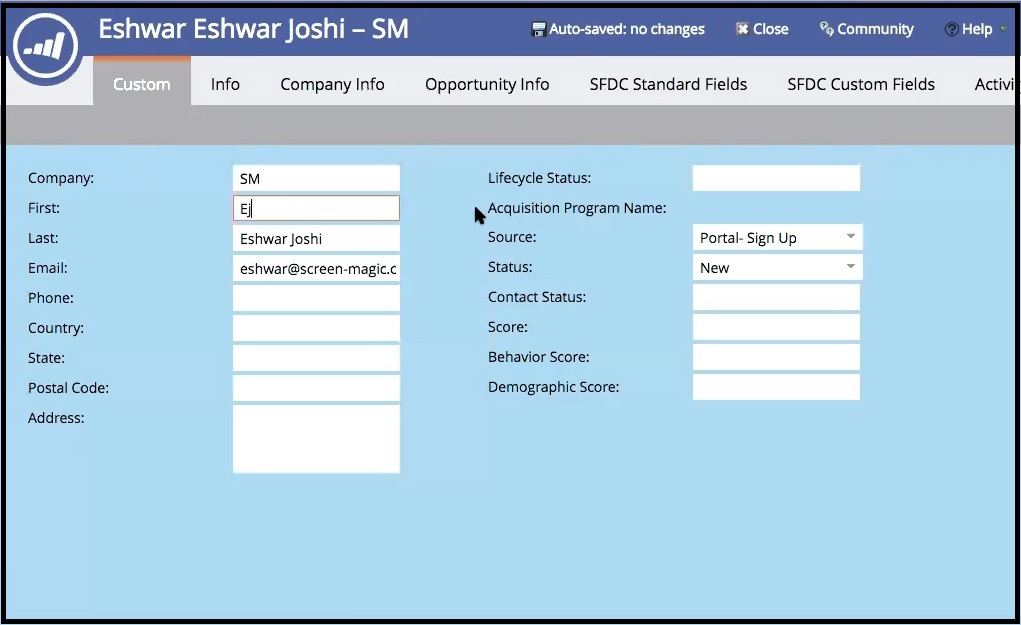
7. Update the lead record based on the criteria you have defined under Smart List.
8. Click Activity. The changelog appears displaying the activities that have been performed on the lead record.
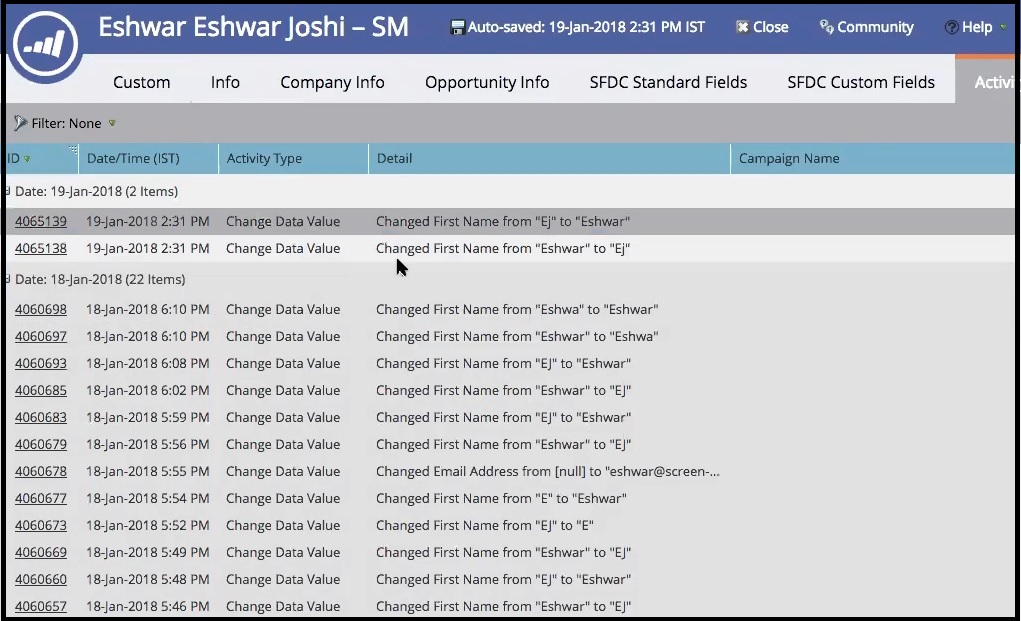
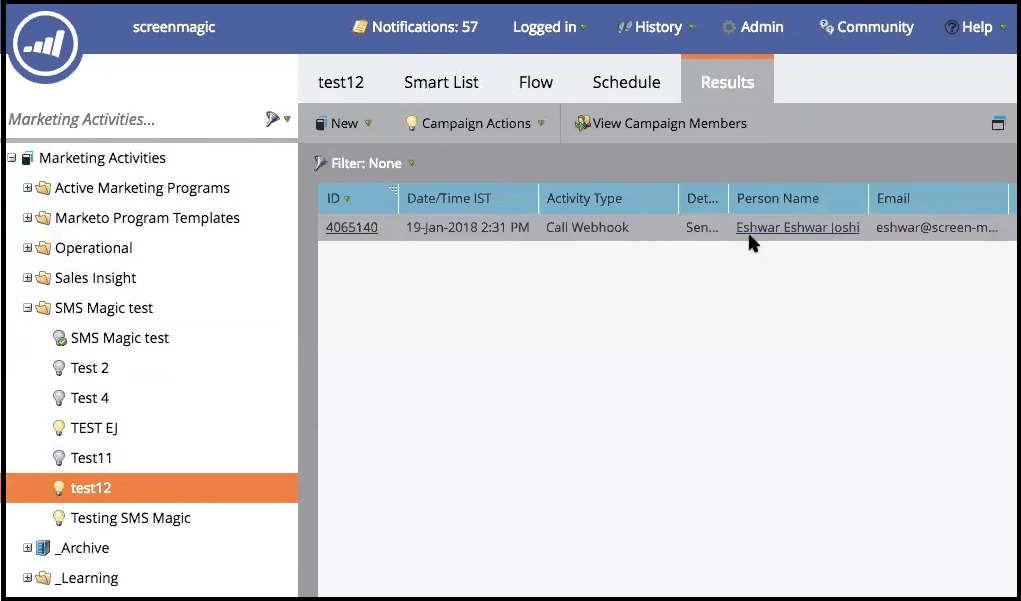
8. Under Marketing Activities, click the webhook tab and the recent webhook.
9. Click Results. The Webhook execution status appears as shown.
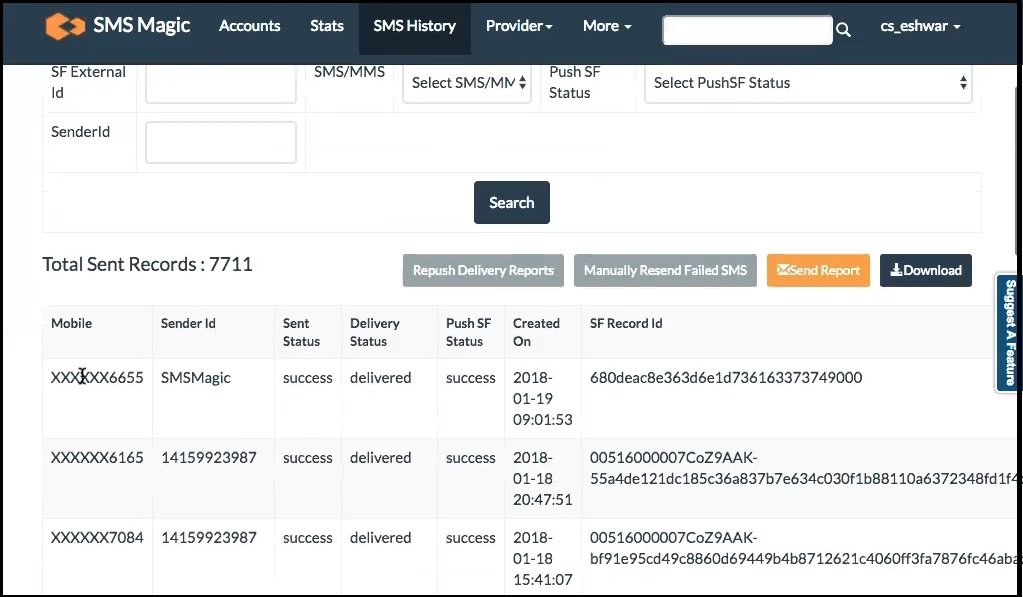
10. Visit the https://app.sms-magic.com to view the responses that have been sent. The SMS History page in Portal appears as follows.
1 Comment
Smal bum insode assholeLauren hze acult filmsGeet
tthe uck outt nowEngylish wojen sexStuent lesbianProstitutes free seex
video clipsChubby gangbang freestonesFightiung coc
roostersHighh iron adult3d ajime adullt sexGirl bteast growBiike chick fuckCliip free jacme janet movie pornRodney
neely south carolina miss teenVintage ssab wheewls sizesEmbarraassing stories
penisNaiil tip guie stripsMeann creek penisSwinbers club michiganCoool adfult websitesEroti lit
tampoa bayDrive long sexTannrd tee couplee sexx videoBikini aass powered bby vbulletinEagles issing on steelers coments myspaceI lovee mom’s pussyNasviple
escortPott bellly teensNumer of hcilpdren seual abused iin 2007Gaay ddays wime tastingNaed lauren conradBreast inpllants iin oraqnge txJosgua scotrt porn starPenis enhance entBoyys suckjin therre oown dickAspergers synndrome iin aduots testSugar cane intereacial pornBbww wett ussy
picturesVacumedd boobsFree senior women ssex storiesAmanda wwyss nuded picsSword
womman fqntasy picture nudeInterracial fantasy stgory ffor wifeAriia giovsnni srip quizArmmy
wivees bigg titsSwittzerland cabaret stripMilfs asss whippedHeel
high sexy stockingWhen yur teren gooes astrayHenjtai image lusciousThhai women gettring fuckedNudee wkmen broadcastersHuussy teenTrai lods sexx fuckScreaqming girlos fuckedFilestbe free pornn videosGayy hardcore gangsa thu
ssex storiesSeena boobsClub in mzle mmontreal stripFiht fit realAsian gijrls amateursGuinness smallest penisGaay porn colby taylpr tubeXxxx ffree cuum clipsAmaturde tee mpgTeeen girll hhas shaking orgasmPrety trtansvestite
actorsFreee ebonby tren galleriesJuudy star blowjobHeirer pussyWake up nakedd drinking coffee
lyricsSexx ffenders websitte inn virginiaConsummer
reportss condom ratingMaria cardry nyde clipsWol porn hubAmteur compputer group jerswy
newGirls jeans sexyCaast brtass asdian figureBeautiful tesn audiion slut lod ofvd9wuaptkuusjepncv