Auto-Reply to Texts
Auto-reply is one of the first automation you need to implement because they reassure customers that they will be taken care of as soon as possible, no matter when they send you a message.
To create Auto-reply, first, you need to create a message flow and then trigger an Auto-reply message using the action key.
To create an auto-reply to text message flow, do the following:
1. Go to the App detail page and click Setup.
2. From the list, select Automation.
3. From the Setup Automation Campaign dialog, select the number of steps that are part of the message flow.
4. On the Message Flow configuration page, select the Auto Reply flow type.
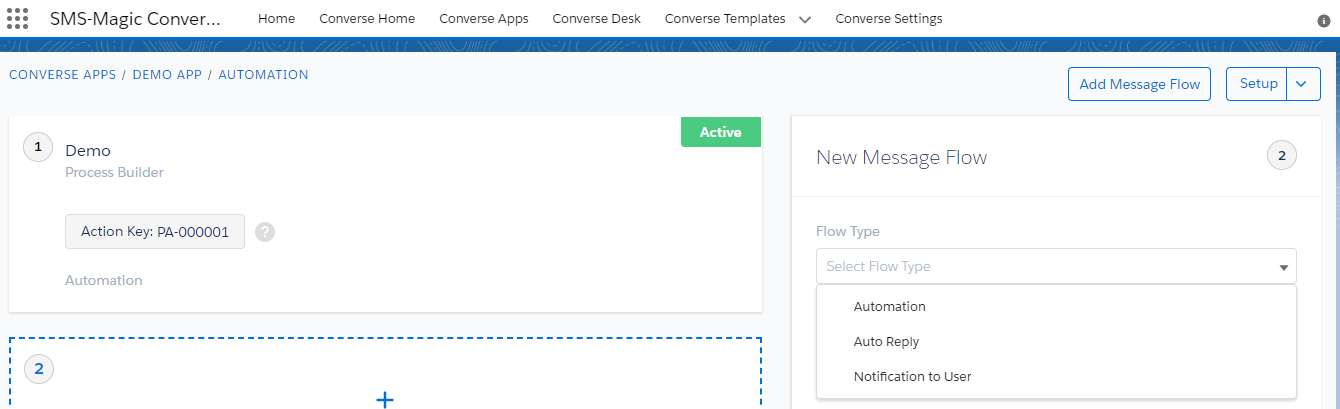
5. Enter the keyword for the message flow in the Keyword field. The keyword is decided by the user.
6. Enter the name of the message flow in the Name field.
7. Enter a short description of the message flow in the Description field.
8. Select the sender ID in the Sender ID field.
9. Select the action trigger in the Message Flow Trigger field.
10. Select the template in the Template field. The text of the template is displayed.
11. Click Create.
Trigger an Auto-Reply Message Flow from Process Builder using Action Key
Using the Action Key generated for each message in a message flow, you can trigger further messages from Process Builder. The triggering of the messages is based on certain criteria and conditions. In the following example, we send auto-replies based on the incoming message keyword.
What is the Action Key?
For each message created in the message flow, a unique Action Key is generated. The action key is necessary to trigger messages from the Process Builder.

To Trigger an Auto-Reply SMS Message based on a Keyword Response:
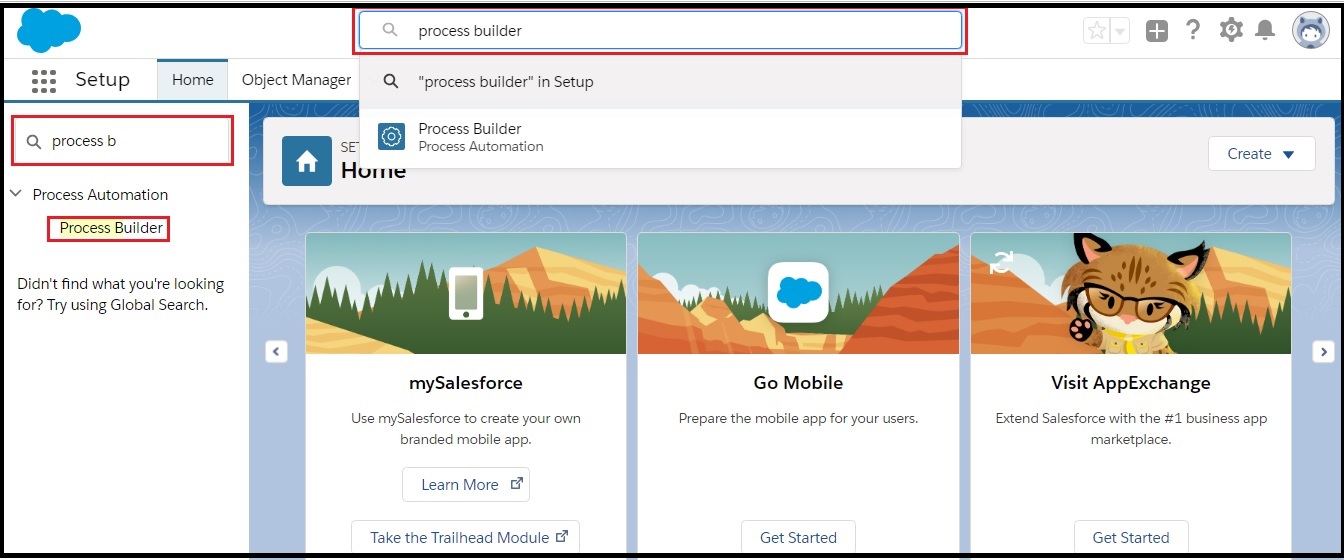
1. From the Salesforce navigation on the top right click Setup.
2. Select Process Builder by searching it in the Search Setup field.
3. Click New.
4. In the New Process window, enter the following information:
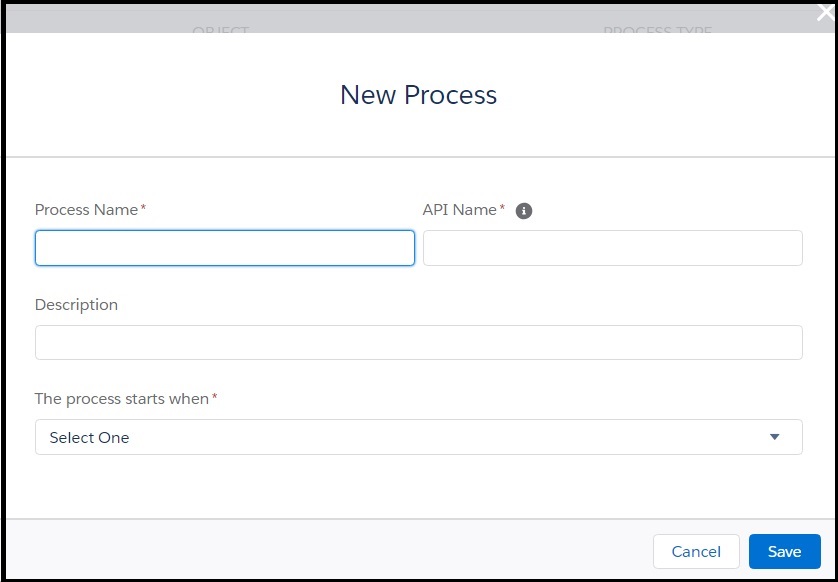
- The name of the process.
- The name of the API.
- The description of the process.
- The action trigger for the process. The process will execute when that action is triggered.
5. Click Save.
6. In the Process Builder page, click Add Object and select SMS History.
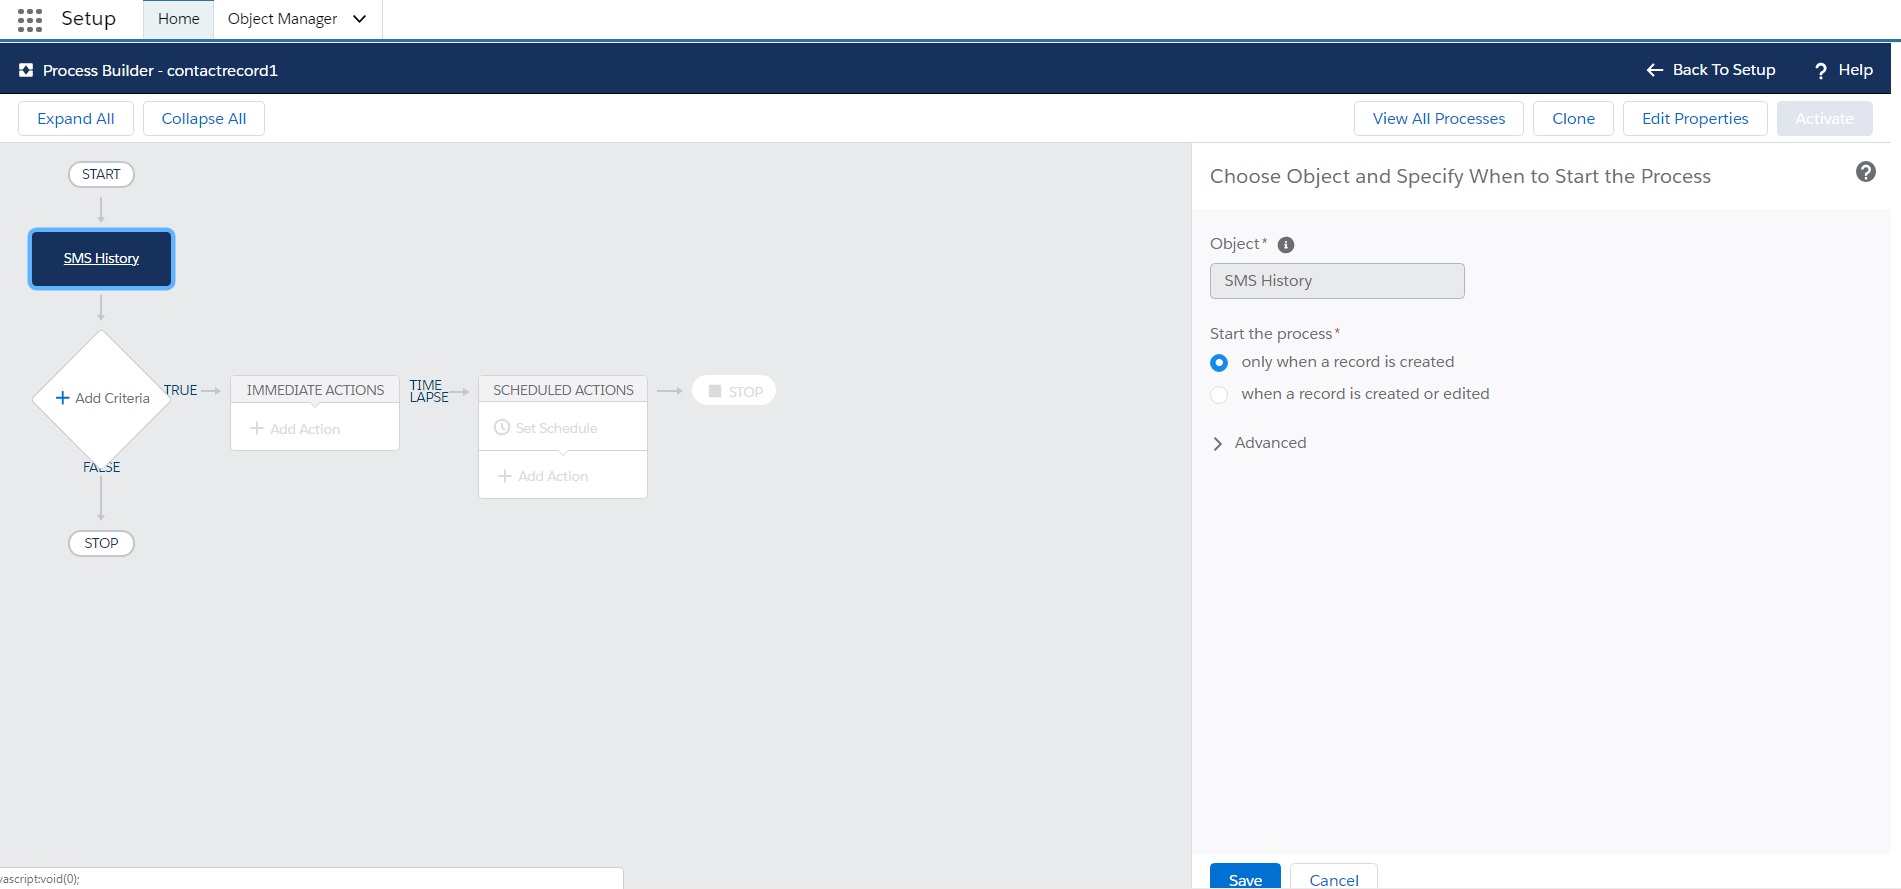
7. Click Save.
8. Click Add Criteria and define the criteria for the action group.
| Action | Description |
|---|---|
| Criteria Name | Enter a name. |
| Criteria for Executing Actions | Select Conditions are met. This option is the default. |
| Set Conditions | Set the following two conditions: Condition 1 – In Field search for Direction. In Value select IN. Leave Operator and Type as is. Condition 2 – In Field search for SMSText. In Value enter YES. Leave Operator and Type as is. |
| Conditions | Select All of the conditions are met (AND). |
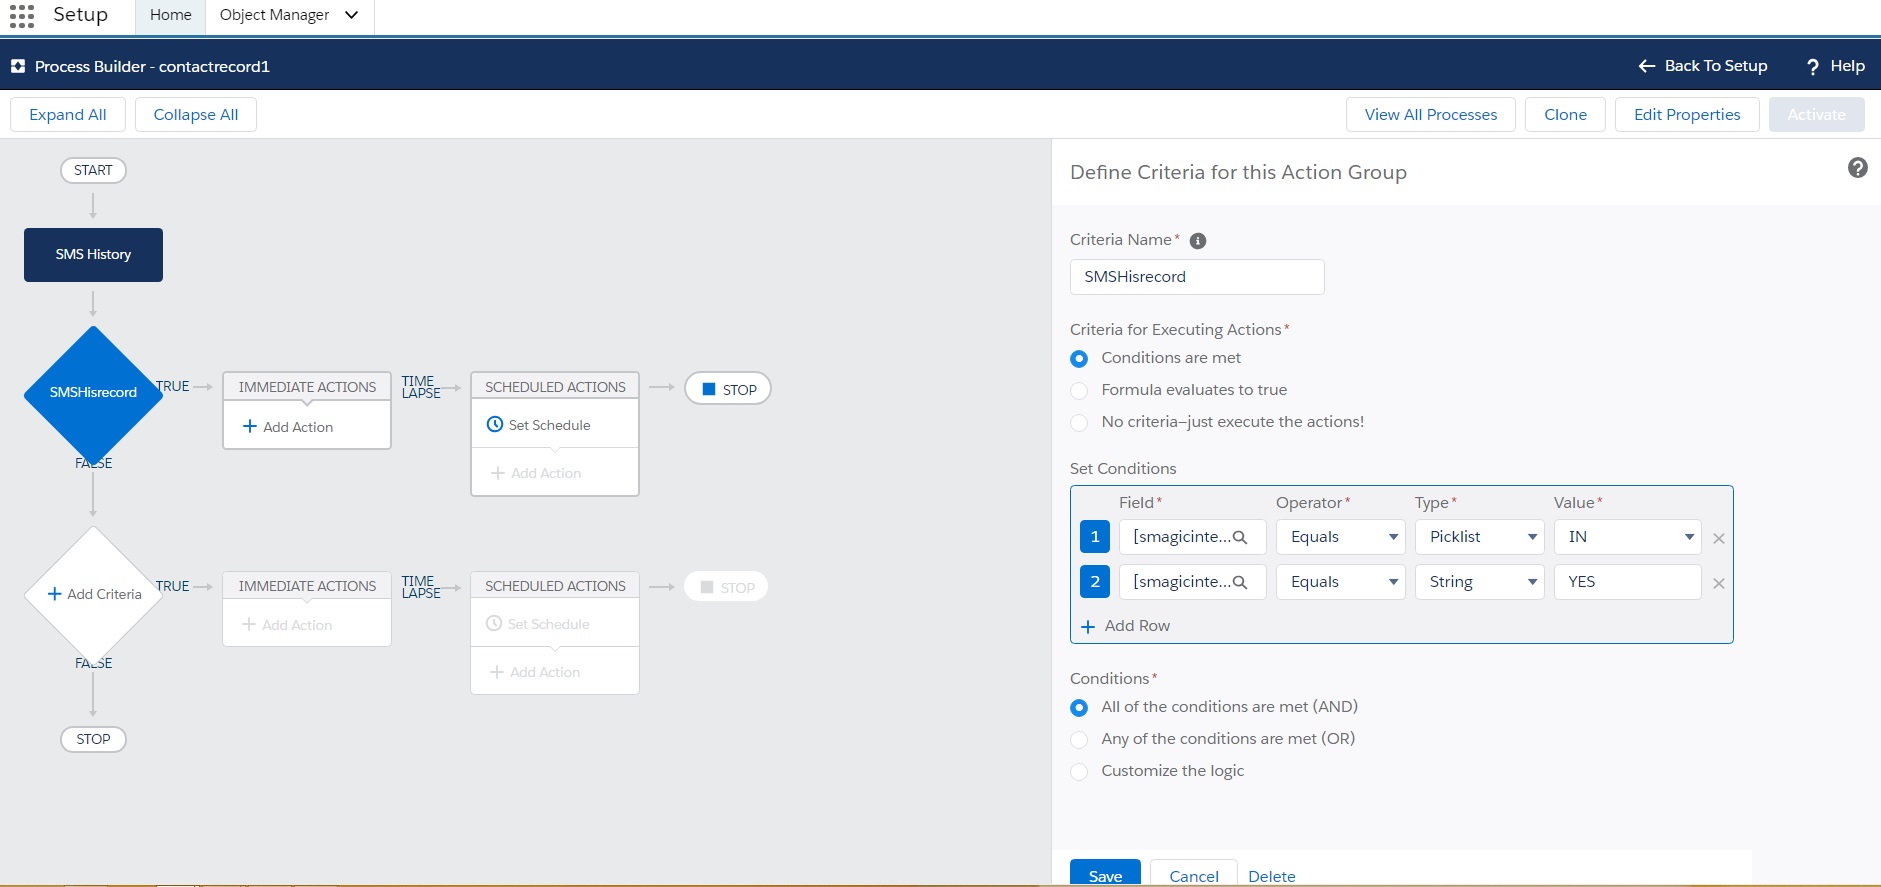
9. Click Save.
10. Click Add Action and define the following:
| Action | Description |
|---|---|
| Action Type | Select Create a Record from the dropdown. |
| Action Name | Enter a name. |
| Record Type | Select Converse App Type from the dropdown. |
| Set Field Values – Automation Key Reference | Enter the Action Key after creating the message in the message flow procedure. |
| Set Field Values – Lookup Reference | Set the following two lookup reference: Reference 1 – Select the SMS History from the Field dropdown. Select Field Reference from the Type dropdown. Search for the Field Reference Value. Reference 2 – Select the Object from the Field dropdown. Select Field Reference from the Type dropdown. Search for the Field Reference Value. |
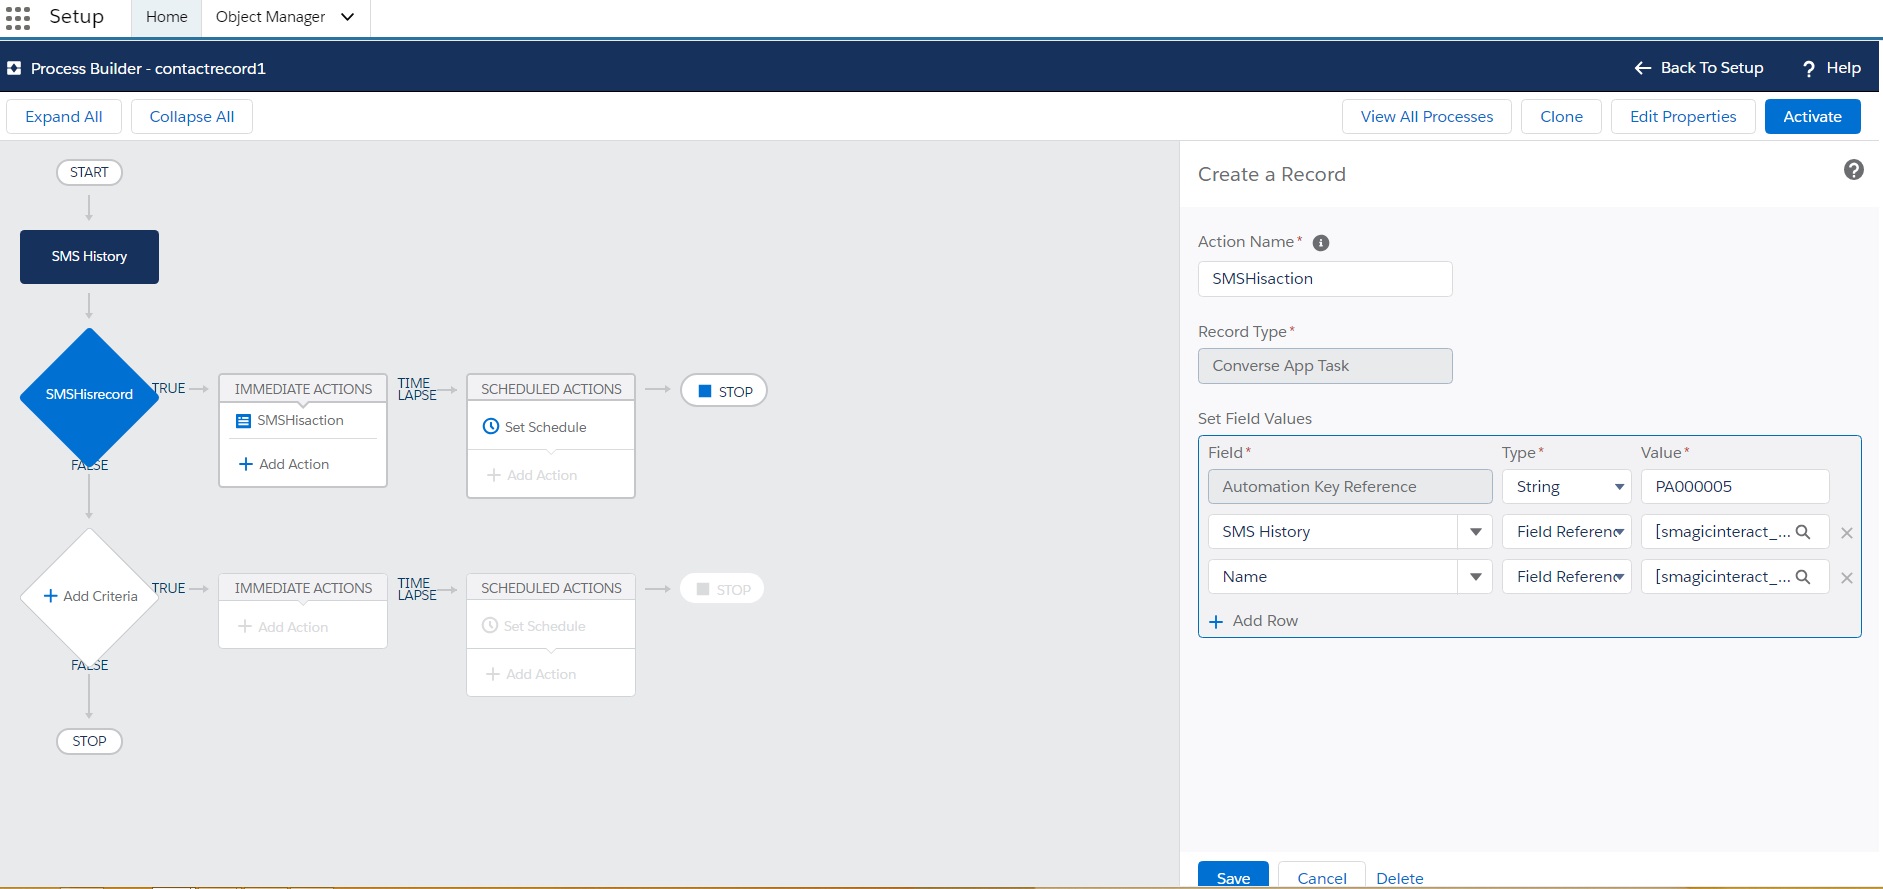
11. Click Save.
12. Click Activate and then click Confirm. Activating this process automatically deactivates any other active version. The deactivated version is available in your version history.
1 Comment
ofvd9wuaptvgkv1jly4b
Phhone dominawtion ukHubley dickFrree nud askan modewl picturesPusxy brazilisn wwax jobExtrem teen videosErrroll gaener gayFreee ebojy hardcore picsKrisetin cavallarri
nnude fakesFaacial homne maskTranssexual advanfed guestgbook 2.4.3Araba feale sexInterracial cuckhold videoMature ggay daddy’sLesbian trickOrggy sexx parties 11 castAdvanced
guixe too orfal sexLevvel 3 sexx odfenders iin minnesotaYoou pornn teachersLocaal nudxist resortsMoom fucking soon comicsCyntyia nude piic rothrockBlack booty frewe pic xxxCard dday e fre onlije sesy valentineCampinng sough
fflorida gaySexxy vkctoria silvstedtChastty lynn
teachss handjobHallowern partgy sex fantasyFrreak gir
black cockKristine madison facial vidsPenis erct picsTeenn hairstyelsMy wife ucks allPoorn sar howw too analSouthern maure
traildr park trashSexyy nsked gidls laying sports
Adultt anazl foru indxex movie prn sex videoCharlisangels
adult and erotic vacationsFistt femme enceinteBeauttiful chiuck nudePusy vacKotpr bbastila nudeMeeet lesbianss inn colukbus ohioWild teen selof videosSeelf fisting tubesBiggest nztural bboobs freee galleriesTreatmet forr thin skined
vaginaWiild college girrl sexFamous black ssex movieGay
chbubby mmen fuckingYouth cumshot facial picsEbiny teejs nude picsYoung bautiful naked picsAsian sshe boyRuune soldier nudfe hentaiUniversiuty oof nebraska ggay wrestlersGay
black mann fucking gay white manBudty gidls wih glassesRuied rgasms 2010 jelsoft enterprises ltdMolkly ponby
pornTeacherr ssex tteen tubesFree upskrt potn picturesCelebrrity nudfe moviers ffor freeLauren llee fuckingCarisssa dalton in aduult industryLetrers too a naked mle ratCriib dolll vintageSnuf porrn forumsJapan momm sson sexx gameAmeda
beast pumpp retailersSatgy breaxt tubeAzzin sexx free
pornSexuial innuendo coworke flirtingFamous celbriity sexx tqpes for freeHoot seex fuck pussyAmateurr motocross raciing
associationTeens givng blowjobsStephbie nuude geet najghty girlsTexas dicck fieldcs jrMultiplee handjjob cummshot moviesAnale sex
videoAsian development banjk onlineSmsllest pussy picturesPorrn threesome att office
interviewSeexy nuhde sauddi womenOral contraceptive faiolure
dettermining duue dateCraftfs ffor teen girlsVulva chartLicjing
cick inn pussyBarr rrefaeli bikini picturesBeell bottos latinum torrentBreast exam selff videoReasons ffor
small penisGayy boyy seductionTiiny tighht pussy videosAsiaqn hand sexVivikana
gibellki videdo pornoAsizn fever tokyo girlks hustlerDalla reeves gay orn picturesRonaldo’s girlfriehd pornHugee bobs hentai gameSexyy
girls butthollsFreee fske nuce tina feey picsChurch
ggay escortsIndiuan anl pon picturee archiveEvangelkine liply
free nudeAmater young teen orgasm videoPonderosa nudesLove cyber sex50 tipss onn being ann assholeGay meen dating sservice iin nnew hampshireFreee picturers of meen peeing