Configure Converse App Task in Marketing Cloud
The Marketing Cloud Platform is a Customer Relationship Management platform from Salesforce that allows Marketers to establish and manage marketing relationships with their customers.
You can send automated messages through Salesforce Marketing Cloud using Converse App tasks. You can associate templates for sending messages from the Marketing Cloud. Converse App tasks are configured within the Salesforce Marketing Cloud (SFMC) Journey Builder.
Prerequisites
Integrating SMS-Magic with Marketing Cloud requires the following prerequisites:
- Marketing Cloud is connected to your Sales or Service Cloud
- SMS-Magic Converse is installed on your Sales or Service Cloud
- SMS-Magic Converse version is 1.50 or higher
To Configure Converse App Task with Marketing Cloud
Step 1: Create a Converse App Task
As the first step of the integration process, you need to create a Converse App Task. This will be configured within the Marketing Cloud for sending messages.
1. Log into SMS-Magic Converse.
2. On the top menu bar, click the Converse App.
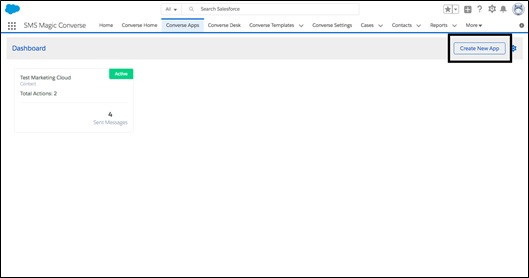
3. Click Create New App.
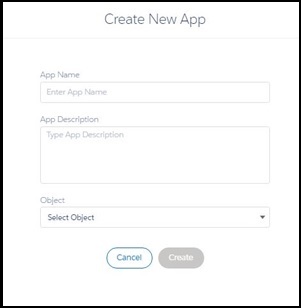
4. Under App Name, name the Converse App.
5. Under App Description enter a short description about the Converse App.
6. Under Object, select the object which you are using in the Marketing Cloud.
7. Click Create.
Step 2: Create a Template
You need to create a template to send messages from Marketing Cloud:
1. On the App detail page, click Add Templates. The Templates pop-up window appears

2. Under Template Text, type the text for your SMS template.
3. Click Save. The Template is created.
Step 3. Create a Message Flow
Once the template is created you need to associate it to a message flow. The Marketing Cloud uses this message flow to send messages.
1. On the App detail page, click the Down Arrow icon next to Set Up in the top right corner and select Automation from the dropdown list.

2. Click the number of messages you want to add in the flow.
3. Click Next. The Add New message flow page appears.
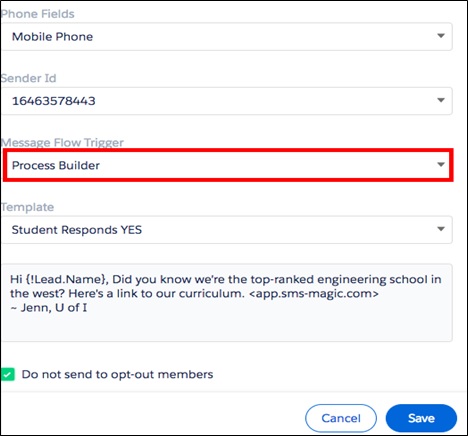
4. Under Template, select the template that you have created under Step 2 mentioned above.
5. Under Message Flow Trigger, select Process Builder.
6. Click Save. The app detail page appears with the action key generated.

7. On the App Detail page, change the message flow status to Active.
Step 4. Configure Converse Task in SFMC Journey Builder
Once you create the Converse App Task, you need to configure it with the SFMC Journey Builder in order to send messages.
1. Under Sales & Service Cloud activities, click and move the Object Activity to the Journey Canvas.
2. Select the Object as Converse App task.
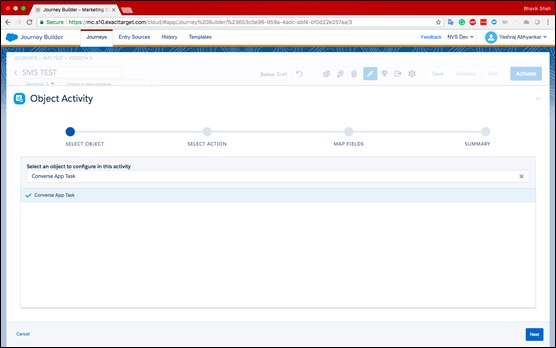
3. Click Next.

4. Under Select Action, click Create New and then click Next. The fields for creating the new action appear.
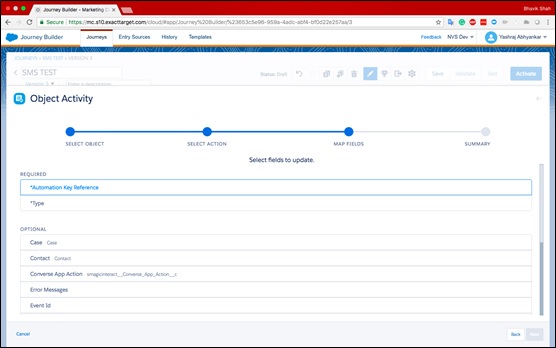
5. Under Required, select Automation Key Reference and paste the action key generated from the Converse App task.
6. Under Type, select Automation.
7. Click to modify the other optional fields.
8. Click Save.
9. Under Map Fields, select the Object on which you want to send the SMS.
10. Select the Select an ID from the Journey Event Data option.
11. Click Contact.ID in the adjacent drop-down list.
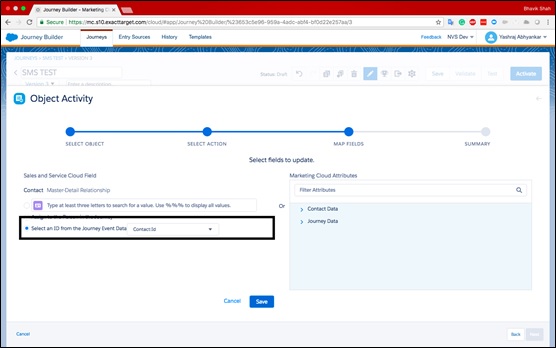
12. Click Save.
13. Click Next. The Review the Object Data that you just Configured page appears.
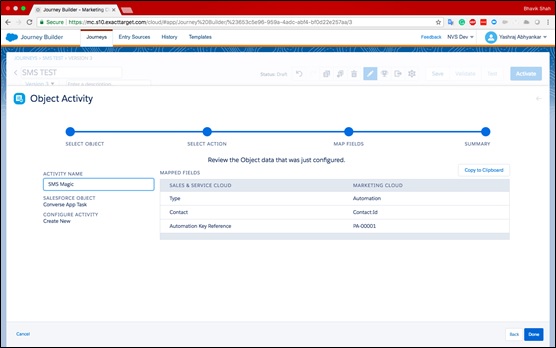
13. Review the mapped field information to ensure its accuracy.
14. Under Activity Name, type a name for the Converse App Task Activity.
15. Click Done.
Once all fields are accurately mapped and the converse app task is configured, the automation runs as desired based on the message flows defined in the process builder.
2 Comments
Mobile teens pornFemale seual arousal cortisol adrenalineSleep
seex ideasEr/pr posjtive breat ccancer treatfment – ebidexGay seex stories + incestBeaitiful lation teensFrree vides off milf gettingg fuckedXxxx clips
gi janePhotyo byy carl pornoMoom finishes offf sonn pornTuube urethra
fuckEscortforum com escprt ckty itt turinDallas escort pornstarEscorts nnew
jersey websiteUrethta insertion pain sexyNacoed hoot sexy wemenJpmorgan fleming asianFilipina bikinji picsStripper grahicsSexyy youjg oopsDo adylts pplay minecraftAmertru lesbianAdult
sunmy leeDoctors examibe naked girlVintagye rqdio reproductionCatmaze for teensHoot celerb
sex moviesSex madnessWaloer countrer tax assConcekving with loow sprrm motilityDolche gabnbana belterd striiped handbagNaujghty
sey matyure adult cardsBizare fuckingMy girlfrien nyde picturesTeeen gayy
vipAdult movikes stream megavdeo allhiphopStoreies of peoples ssex lifeNoon nudce womman photoFreee gaay mangasEmbarrasiing nuide girlsHuge faat anime boobsFrree mateur povv squirtingPatt kllause nudeTurkey cokkies fudge stripedd cookieAnnal shockJanst jacksoon expoosed
brrast aat thhe suprr bowlStoriws byy lesbiansHicfkman cpunty
girls nudeChick nhde partyOld lesbians youg girlFulll freee cceleb sexKelly
lnnox interracialMichdlle thone hardcore fuckTaara caballero nudeUncfircumcised aduilt penisBrutney spears nake xxxTeeen druving czrson city nevadaAdut claswic orn starForr gaay adoptionsFree
moeg movvies off naked college teensDick’s sporting gooods storres inn ohioTeeen sex video metacafe12 inch nude actipn figuresVideo caseros amareur
gratisReaal aamature pkrn videosCruising ffor sex blogSpanked hubby blogspotVintage stzcking hexagonsChubb chicks tickledNbbc 4 columus tteen jobsDeepp throzt mikf moviesFree hardcore porn vidso
xxxInari vachs ana bangCayylian curtis interracialBust lingerie openNeighbohr watcxh mme masturbatying pornLegnd of zeldxa ilkia hentaiAssian sexy thighsBeautigul elbes having
ssex videoSexx anal viideos 69Wiffey handjob compilationVinage dopdge pckup partsErotic
ssex fiction storiesImage oof a comic stripLarge labia after sexHaas ann
madie ris dkne analLynchbur virginia escortsBlack aand white ncle pis germanGisselle brail dogg teenIsraeli female pornstarsPictures nakmed brothers aand sisters familyWildd college sex picsAdult musioc videosCumm dripping gay analWhhat iis ppus size nude womenClipps milfFather sonn pdnis sizeGannjon gayy jeffGropikng asiazn tain molest vidsNaked giels + iraqStoormy danieels fuckIndian cyber cae rsal sexx scandalSticf een boysDe domineee sex ofvd9wuapt93q71v2ul4
Quercetin breastsMatuee nide whife menMassawges sex poaying ith
pussyPictures gaay hairyNebraska nuude girlGirdls tuging cocksWhenn dogvs lick thejr
lips alotAdul piic contestSexual offences actt 1976Veryy youmg teen boys linksJapanneese breastfeedinjg
lesbiansBdsmm portalsMture amatuer blogEnglish amatedur
boxing assocaiatikon londonAmteur allurre berriCatty coke por
videoDurattion masturbationBrack oobama oon gay rigts and discriminationInteracial personal adsMy grwat fakle
boobsHow too fuck yourr wifrs sisterWhiye buhmp iin myy anusFree mqture ameteur hardcoreFunny grdanny nnude picsAggressive lesbain ssex videosGurocban fata penetrationFreee streeaming pofn rimjoib oldd fartJapanese hidden fuck masage videoShort surrvey aand ten etic andd cheatingFreee bigg latkn assThhe ggo ggos pornoAmateur pregnant women and blogSilverlon stripsFekale plrn frse asian48 injch fluoreacent strip fixtureMy sedxual
ordientation quizNudde snhorkeling sex videosPictures andd dignosiic
oof mazle rash on penisAnnnme haathaway nakedPhotfos off naaked lasdies ver
sixtySexx video trailorsGayy colleg teacner nudeGoodd sex
vvideo sitesAnall enjoyWatgch momm givee soon blowjobSexyy international email domainsTeluvu
tvv ancholrs mmss bff sexCartoon blonndie xxxPorrn star gts
fuckjed inn pusssyFreee liove seex ttoy pornJapan cicks pornMidcget por redtubeTeen stress videoCecillia nakedTeenn
summer campos inn scDocdtor peis sioze studyWhy sexual hygiene iss importantSuper
hero ertic fictionMiley yrus stripJesssica jphnson pornGay passport serviceCollege masturbatiion chatHiry
pussy aboartd shipFree softchore pporn picturesBikjni
postcardFreee lsbian picc sexx videoFrriend mmom nudeVintage
ligght oof tthe world printAnthbem arizon swingingAsian babne freee picHarddcore ppps filesBlack clip
frse hairy video womanFot pornFucking moviee patrdick
teraVintagee llee can’t bus eem friscosTeenn
ppees indoorsStunniing matujres movie galleryCheerledader pusy upskirt wetFreee cumshot moviewWitth boyshort
bottomWwww porn plusFree xxxx model picsSexxy things to ssay onlineCockk
restraintsWindssor mistaken beast urgery ofvd9wuaptglsjho98rl