Configure Sender ID and Assign it to your Users, Campaigns, and Programs
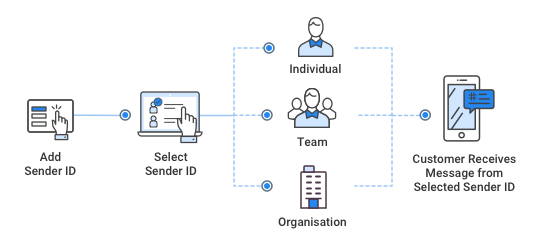
Sender ID is an alphanumeric name or number that appears on the mobile device and helps to identify the sender of the message. It can be a long code or shortcode that you assign to a single user, multiple users, or a profile. Inbound numbers should be used as the Sender Id to receive replies to your outbound messages.
There are some countries that allow you to send SMS with Alphanumeric Sender ID. To get replies you’ll need to procure an Inbound number and give reply instructions in the text of the SMS you send. For example, Dear Customer, Enjoy the Rewardz Festival on your Credit Card. To know more, SMS ‘JOIN’ to 5676756 and register now. For TnC, please visit http://bit.ly/6463nf’.

You can configure Sender IDs for different organizations, teams, or individuals or Campaigns or Messaging Programs to appear as you want on the customer’s mobile device.
You can configure the default templates you wish to use to notify the User assigned to a Sender ID on any incoming message.
In case the Sender ID is assigned to multiple users or a profile, the incoming message notification is sent as per the rules defined in the Sender ID assignment settings page.
For example, if the Notification Recipient field displays Last Sender as its value, then the incoming message goes to the last user (within the profile or group of users) who sent the message.
In the Manage Notification pop-up window, you can configure the notification of a Sender ID. You set the recipient of the notification as well as select the email template to be used for notifying the recipients.
To know more about email templates and how to create them, see Email Templates.
You can associate an incoming number to a Sender ID only if it is defined for outgoing messages. Country-wise restrictions determine if the same Sender ID can be used for both incoming or outgoing messages.
Guidelines for Choosing Sender ID’s
| Manual SMS | Campaigns | Automations / Services | |
| Key Considerations | Better to give reps or agents dedicated numbers for personalized conversations (Similar to a dedicated phone line) Use one Sender ID for one type of conversation with a recipient (Do not use many senders because it will confuse the recipients) | Keep dedicated numbers for campaigns (Do not mix service numbers and manual SMS’) | One Service One Number – It helps in easy recall for recipients, makes compliance management easier (Think of it as a sales or support service line) |
| Exceptions | Sales campaigns (Must use the lead or contact owner’s sender ID) | No-Response Automations / Services (Must have an auto-responder telling user about the same) | |
| If a rep or agent is absent (Share conversations, messages, and sender IDs for someone else to respond) | The campaign generated responses handled by reps should use the same campaign ID (for familiarity) | Preferable to have someone monitor automation or service responses (Key indicator of user satisfaction) | |
| Inbox | Give dedicated inbox | Filter campaign responses in inbox for sales handling | If you handle responses, then filter the Converse App in inbox |
Configure User Notification on Incoming SMS
You can configure User Notification on new incoming messages. You can configure the default email templates that you wish to use to notify the User assigned to a Sender ID on any incoming message. In case the Sender ID is assigned to multiple users or a profile, the incoming message notification is sent as per the rules defined in the Sender ID assignment settings page. For example, if the Notification Recipient field displays Last Sender as its value, then the incoming message goes to the last user (within the profile or group of users) who sent the message.
In the Manage Notification pop-up window, you can configure the notification of a Sender ID. You set the recipient of the notification as well as select the email template to be used for notifying the recipients.
For more information about configuring the sender ID, see Configure and Assign Sender ID.

0 Comments